Installation & Setup Wizard
- Before you begin: requirements
- Required PHP extensions
- Step 1 — Upload the code
- Step 2 — Install dependencies and build assets
- Step 3 — Configure your environment file
- Step 4 — Run the install wizard
- Welcome — environment check
- Step 1 of the wizard — Database connection
- Step 2 of the wizard — Build database
- Step 3 of the wizard — Create your admin account
- Installation complete
- After install: activate your license
- Permissions
- Web server: document root must point at public/
- Nginx
- Apache
- Background workers (recommended)
- Post-install checklist
This guide walks you through standing up your own AdSafelink instance on your server. AdSafelink is a self-hosted, monetized URL shortener that ships bundled with WP Safelink Pro. The setup experience mirrors AdLinkFly: you upload the code, run a couple of build commands, configure a single environment file, and then complete a short in-browser install wizard. You only need to do this once per server. After the wizard finishes, you activate your bundled license from the admin panel.
Before you begin: requirements
AdSafelink is a modern PHP application. Make sure your server has everything below in place. The wizard re-checks the PHP requirements on its first screen, but confirming them up front saves a round trip.
| Requirement | Minimum | Notes |
|---|---|---|
| PHP | 8.2 | 8.2 is the floor the wizard enforces. PHP 8.3 is recommended. |
| MySQL | 8.0 | MariaDB 10.6+ also works. This is the only database AdSafelink connects to. |
| Redis | 6+ | Powers cache, sessions, and the job queue. Required, not optional. |
| Composer | 2.x | Installs the PHP dependencies. |
| Node.js | 18+ (with npm) | Builds the front-end assets. Needed only at build time, not at runtime. |
| Web server | Nginx or Apache | Document root must point at the public/ directory (see below). |
Required PHP extensions
The wizard’s Welcome screen verifies each of these and blocks installation until they are all loaded:
mbstringopensslintlbcmathcurl(with HTTPS support, needed to reach the license API)pdo_mysqlgd
On a typical Debian or Ubuntu host you can install them all with:
sudo apt install php8.3-cli php8.3-fpm php8.3-mysql php8.3-mbstring
  php8.3-intl php8.3-bcmath php8.3-curl php8.3-gd php8.3-redis
The wizard also checks that the storage/ and bootstrap/cache/ directories are writable. If either is not, the Welcome screen flags it. Fix the permissions (see the section on permissions below) before continuing.
Step 1 — Upload the code
Copy the AdSafelink application onto your server, into the directory you will serve the site from. You can use SFTP, git clone, scp, or rsync — whatever you normally use. For example:
# Example: deploy into /var/www/adsafelink
rsync -avz --exclude='.git' --exclude='node_modules' --exclude='.env'
  ./adsafelink/ user@your-server:/var/www/adsafelink/
The important part is that the whole application lands on the server, and that your web server’s document root will later point at the public/ folder inside it.
Step 2 — Install dependencies and build assets
From the application root on the server, install the PHP packages and build the front-end bundles:
cd /var/www/adsafelink

# 1. PHP dependencies (production, optimized autoloader)
composer install --no-dev --optimize-autoloader

# 2. Front-end assets (compiled into public/build/)
npm ci
npm run build
What each command does:
composer install --no-devpulls in the application framework, the admin panel, the payment SDKs, GeoIP support, and the queue worker.--no-devskips test and development tooling;--optimize-autoloaderspeeds up class loading in production.npm run buildcompiles the CSS and JavaScript intopublic/build/. Run it again any time you change front-end assets. Thenpm cistep first installs the exact dependency versions from the lockfile.
Step 3 — Configure your environment file
Copy the example environment file and generate a fresh application key:
cp .env.example .env
php artisan key:generate
Then open .env and set the essentials below. You do not need to fill in the database block by hand — the install wizard tests your database connection and writes the DB_* values for you. Review these keys now:
APP_NAME=AdSafelink
APP_ENV=production          # use 'production' on a live server
APP_DEBUG=false             # MUST be false in production
APP_URL=https://your-site.com   # your real public URL — used for license domain-locking

# Redis powers cache, sessions, and the queue. Point these at your Redis server.
REDIS_HOST=127.0.0.1
REDIS_PORT=6379
REDIS_PASSWORD=null

CACHE_STORE=redis
SESSION_DRIVER=redis
QUEUE_CONNECTION=redis

# Mail — needed for password resets, payout notices, and contact replies.
MAIL_MAILER=smtp
MAIL_HOST=...
MAIL_PORT=...
MAIL_USERNAME=...
MAIL_PASSWORD=...
MAIL_FROM_ADDRESS="admin@your-site.com"
Key points to get right:
APP_URLmust match the public URL your visitors and publishers will use. Your license is domain-locked, so a mismatch here can cause license verification to fail later.APP_DEBUG=falseon any internet-facing install. Leaving ittrueleaks stack traces and configuration details.- Redis must be reachable. Cache, sessions, and the job queue all rely on it; if Redis is down the application will not boot cleanly.
- The license key stays blank for now. Licensing is bundled and resolved after the wizard — you enter it in the admin panel. See the Licensing article.
- The
DB_*lines can stay at their defaults or blank — the wizard fills them in for you in the next step.
Step 4 — Run the install wizard
With the code uploaded, dependencies built, and .env in place, open your site in a browser. Because the app is not yet installed, any request redirects to the install wizard at:
https://your-site.com/installThe wizard mirrors AdLinkFly’s screen titles and sequence. There is intentionally no license or purchase-code step here — licensing is handled afterward.
The wizard can only be run once. After it finishes, visiting /install redirects you to the homepage, and each step independently refuses to run again.
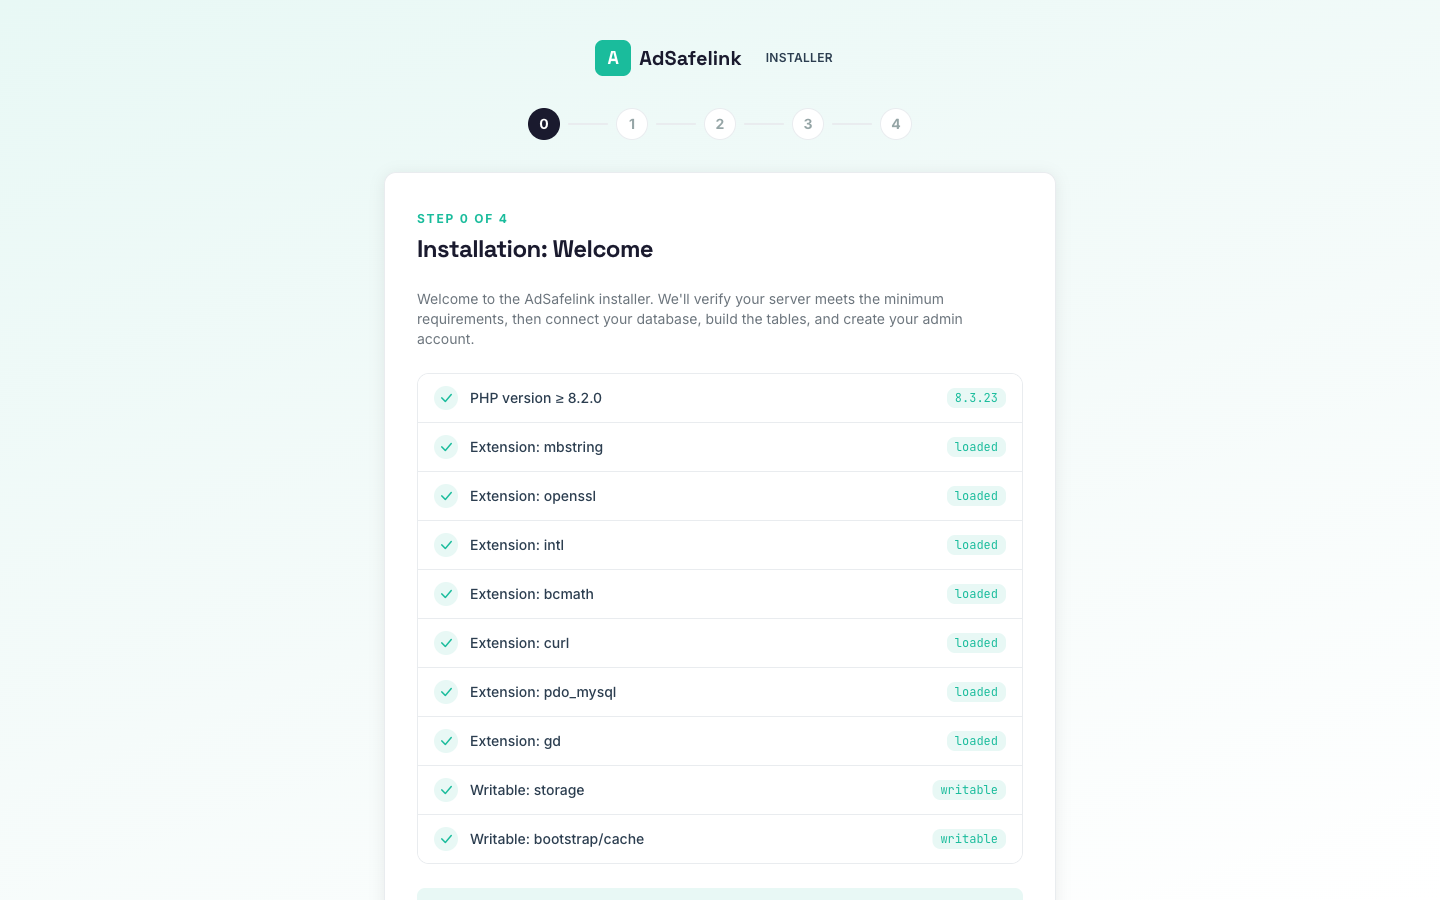
Welcome — environment check
The first screen runs a server self-check and lists every requirement with a pass or fail badge:
- PHP version is 8.2 or higher
- Each required extension is loaded (
mbstring,openssl,intl,bcmath,curl,pdo_mysql,gd) storage/andbootstrap/cache/are writable
If everything passes, you’ll see a confirmation that minimum requirements are met, along with an Install button that takes you to the database step. If anything fails, the failing rows are marked in red and the button is hidden. Fix those items — install the missing extension or correct the permissions — and reload the page.
Step 1 of the wizard — Database connection
This screen presents a form for your MySQL connection details:
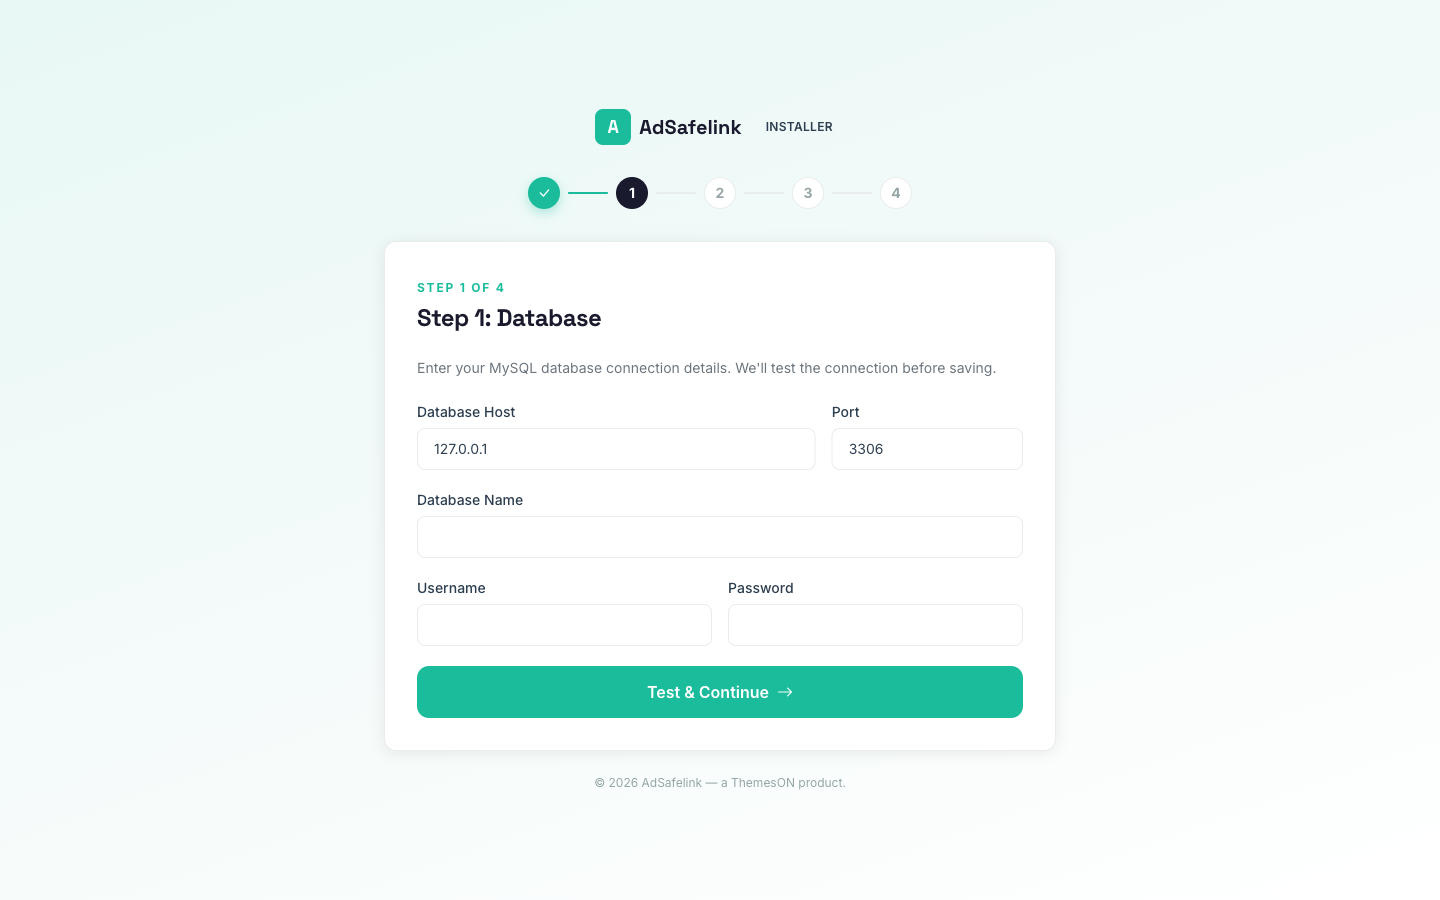
| Field | Default | Notes |
|---|---|---|
| Database Host | 127.0.0.1 | Hostname or IP of your MySQL server. |
| Port | 3306 | |
| Database Name | — | The empty database AdSafelink will use. Create it first. |
| Username | — | A MySQL user with full rights on that database. |
| Password | — | Optional. Leave blank if your DB user has no password. |
When you submit, AdSafelink opens a live connection to test the credentials before saving anything. If the connection fails, you’ll see a Connection failed message with the underlying error and the form is returned so you can correct it. On success, the wizard writes the DB_* values into your .env file, applies them to the live connection, and advances to the next step.
Create the empty database before this step (for example, CREATE DATABASE adsafelink;). The wizard connects to it but does not create the database itself.
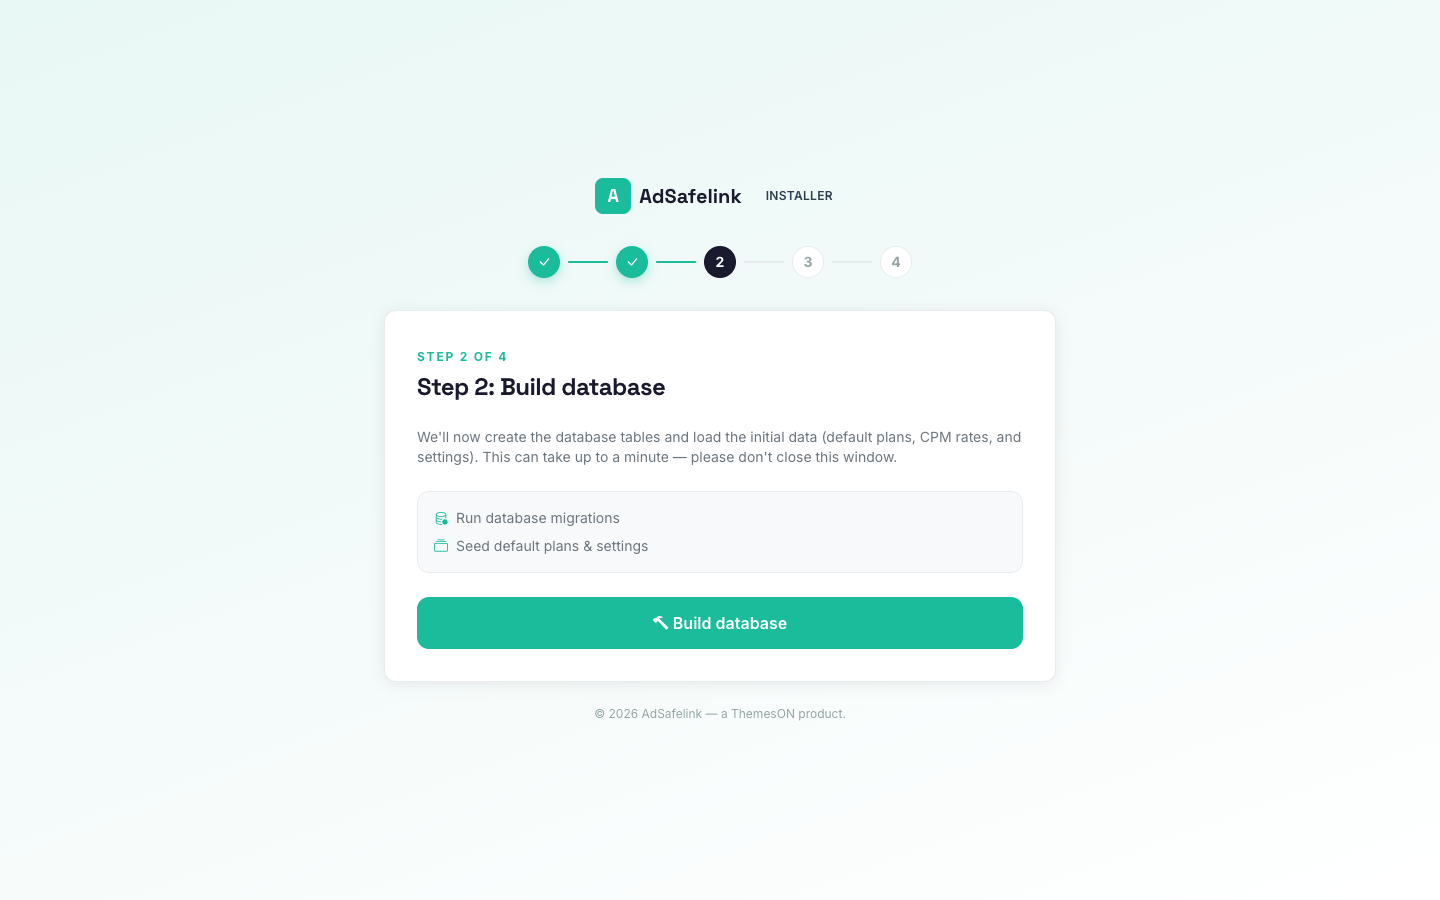
Step 2 of the wizard — Build database
This screen shows a single Build database button. When you click it, AdSafelink:
- Raises the script time limit (to roughly ten minutes, where the host allows it) so large migrations don’t time out.
- Runs all database migrations to create every table.
- Runs an idempotent seeder to insert the default data — including the default plan that the admin account you create next is assigned to, the per-country CPM rates, and the default site settings.
The button shows a spinner and disables itself while it works. On success, you advance to the admin step. If anything fails, you’ll see a Can not load initial data message with the error; the step is safe to retry once the cause is fixed.
Step 3 of the wizard — Create your admin account
This screen presents a form to create your administrator account:
| Field | Rules |
|---|---|
| Email Address | A valid, unique email address. |
| Username | Unique. Letters, numbers, dashes, and underscores only. |
| Password | At least 8 characters. |
| Confirm Password | Must match the password. |
On submit, AdSafelink creates a full administrator account: the role is set to admin, the status is active, it is assigned the default plan, an API token is generated, the registering IP is recorded, and the email is marked verified immediately. You’re then taken to the final screen.
This step is single-shot. Once an admin user exists, the screen returns a 404 and cannot be replayed — so choose your credentials deliberately.
Installation complete
The final screen flips the two signals that mark the app as installed. It records the install details (including installed_at, your admin email, and your site URL) into the settings, and writes the install flag into your .env file. This dual signal is what stops the wizard from re-running and what the install gate checks on every request.
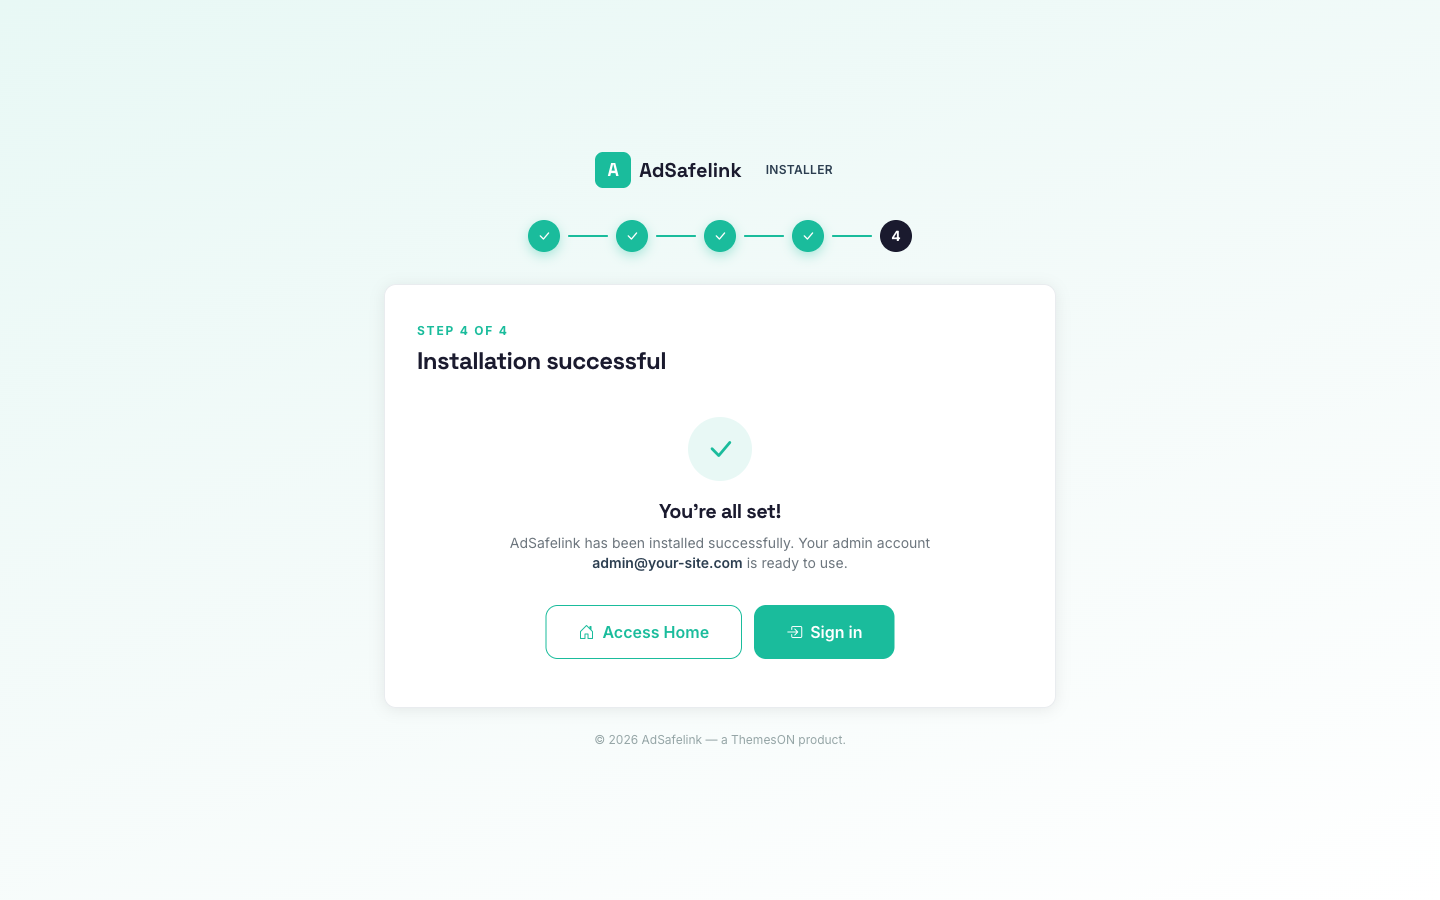
You’ll see a success screen with two buttons:
- Access Home — opens the public homepage.
- Sign in — opens the login screen so you can log in with the admin account you just created.
That’s it — AdSafelink is installed.
After install: activate your license
AdSafelink is bundled-licensed: a valid WP Safelink Pro license unlocks it. The license is not entered during the wizard. After the wizard finishes, sign in to the admin panel, open the License page, and paste your WP Safelink Pro license key there to activate. Because the license is domain-locked to your APP_URL, make sure that value is correct before activating. The full process, including grace periods and re-checks, is covered in the Licensing article.
Permissions
The application needs to write to two directories. Make them writable by your web-server user (shown here as www-data):
sudo chown -R www-data:www-data storage bootstrap/cache
sudo chmod -R 775 storage bootstrap/cache
The wizard’s Welcome screen confirms both are writable before letting you continue.
Web server: document root must point at public/
AdSafelink is served from the public/ subdirectory — never the application root. Pointing your web root at the application root would expose your .env file, source code, and dependencies to the public. Always point it at public/.
Nginx
server {
    listen 80;
    server_name your-site.com;
    root /var/www/adsafelink/public;   # the public/ directory

    index index.php;

    location / {
        try_files $uri $uri/ /index.php?$query_string;
    }

    location ~ .php$ {
        fastcgi_pass unix:/run/php/php8.3-fpm.sock;
        fastcgi_param SCRIPT_FILENAME $realpath_root$fastcgi_script_name;
        include fastcgi_params;
    }

    location ~ /.(?!well-known).* {
        deny all;
    }
}
Apache
Set the DocumentRoot to the public/ folder and allow .htaccess overrides (the application ships a public/.htaccess with the rewrite rules):
<VirtualHost *:80>
    ServerName your-site.com
    DocumentRoot /var/www/adsafelink/public

    <Directory /var/www/adsafelink/public>
        AllowOverride All
        Require all granted
    </Directory>
</VirtualHost>
Background workers (recommended)
AdSafelink uses the Redis queue and a scheduler for ongoing tasks: statistics rollups, withdrawal processing, plan-expiry checks, and the twice-daily license re-check. For these to run on a live install, start the queue worker and add a single scheduler entry to your crontab:
# Process the queue
php artisan horizon

# Run the scheduler — add this line to your system crontab:
* * * * * cd /var/www/adsafelink && php artisan schedule:run >> /dev/null 2>&1
Run the queue worker under a process manager (such as Supervisor) so it stays up. The single cron entry above is what drives all scheduled jobs, including license re-verification.
Post-install checklist
- PHP 8.3 with all required extensions; MySQL 8; Redis reachable.
composer install --no-devandnpm run buildcompleted..envset:APP_URL,APP_DEBUG=false, Redis, and mail.- Wizard finished (Welcome → Database → Build → Admin → Complete).
- License activated in the admin panel’s License page.
- Web root points at
public/. - Queue worker running and the
schedule:runcron installed.
Once all of the above are in place, your AdSafelink instance is live and licensed.
Was this article helpful?